UI-Grid has editing features built in.
But sometimes you want to edit data all at once.
And add some custom validation, third-party controls, and so on.
Normally if you wanted to create your own row modal editor it would mean wiring up a modal service like the one from UI Bootstrap, writing your own form out by hand, including the validation and controls.
It can take a lot of time to write up a form for all your little data points, and let’s be
honest, it’s pretty boring. There’s only so many times I can type in
<input type="text" /> (even with an HTML generator) before I’m sighing
resignedly and shifting in my seat.
In this post I’m going to show you how to short-circuit this routine and create a row editor for UI-Grid in just minutes with a great module called Angular Schema Form. You won’t have to write up any form controls, validation, or save/cancel behavior. The only thing you have to supply is the configuration, and Angular Schema Form will take care of the rest.
Making Your Rows Editable
The first thing we need to do is some basic hook-ups to open a modal to edit our rows. To do this we’ll add a little button as the first column of our grid. For the modal we’ll use UI Bootstrap’s $modal service, and Font Awesome for icons.
These are our column defs, we’ll use edit-button.html as our custom button template.
|
1
2
3
4
5
6
7
|
columnDefs: [
{ field:
'id', name:
'', cellTemplate: 'edit-button.html', width: 34
},
{ name:
'name' },
{ name:
'company' },
{ name:
'phone' },
{ name:
'City', field:
'address.city' },
]
|
And here’s the cell template:
|
1
2
3
4
5
6
7
|
<div
class="ui-grid-cell-contents">
<button type="button"
class="btn btn-xs btn-primary"
ng-click="grid.appScope.vm.editRow(grid, row)">
<i
class="fa fa-edit"></i>
</button>
</div>
|
Notice that the ng-click is firing off a function bound to something called
grid.appScope. UI-Grid uses isolate scope, which means that it does not inherit from the
scope of its ancestor elements; so if you stick your grid inside an element that has a controller on it,
you can’t just access your controller’s scope directly. To help you, UI-Grid binds its parent scope to
grid.appScope. To give you an idea here’s what part of our controller would
look like:
|
1
2
3
4
5
6
7
8
9
10
11
12
13
14
15
16
17
18
19
20
21
22
23
24
25
26
27
28
29
30
31
32
33
34
35
36
37
38
|
MainCtrl.$inject
= ['$modal'];
function MainCtrl($modal) {
var vm
= this;
vm.editRow
= editRow;
vm.gridOptions
= {
columnDefs:
[
{ field:
'id', name: '',
cellTemplate: 'edit-button.html', width:
34 },
{ name:
'name' },
{ name:
'company' },
{ name:
'phone' },
{ name:
'City', field: 'address.city' },
]
};
init();
////////////
function editRow(grid, row)
{
$modal.open({
templateUrl:
'edit-modal.html',
controller:
['$modalInstance', 'grid',
'row', RowEditCtrl],
controllerAs:
'vm',
resolve:
{
grid:
function ()
{ return grid;
},
row:
function ()
{ return row;
}
}
});
}
function init()
{
$http.get('http://ui-grid.info/data/500_complex.json')
.success(function
(data) {
vm.gridOptions.data = data;
});
}
}
|
There’s our editRow function, which we expose by binding it to our controller. If
we declare our controller like ng-controller="MainCtrl as vm" then we’ll have the
vm property available on grid.appScope to use in our button template.
RowEditCtrl will be the controller for the modal which we’ll define later. The
editRow function will take the grid and row as arguments and we’ll inject them into
RowEditCtrl as locals with resolve. You can read about all this in the UI
Bootstrap modal docs.
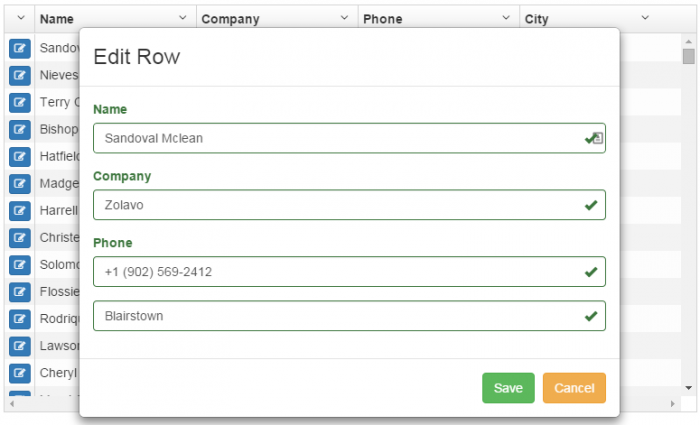
The Modal
The modal is just going to be a super simple bootstrap template, with a form and save and cancel buttons:
|
1
2
3
4
5
6
7
8
9
10
11
12
|
<div>
<div class="modal-header">
<h3 class="modal-title">Edit Row</h3>
</div>
<div class="modal-body">
<form
sf-schema="vm.schema" sf-form="vm.form" sf-model="vm.entity"></form>
</div>
<div class="modal-footer">
<button class="btn btn-success" ng-click="vm.save()">Save</button>
<button class="btn btn-warning" ng-click="$close()">Cancel</button>
</div>
</div>
|
What’s that sf-schema stuff? I’m glad you asked!
Angular Schema Form
Angular Schema Form is a directive that takes a few options and generates a form with inputs bound to the data that you specify.
First there’s the schema. This is a JSON Schema standard object that defines the data in your entity: their type (string, number, boolean, array, etc), title, description, and so on.
Defining Our Schema
Since we know what columns on grid is going to have, we can define our schema in a constant that we can inject in our app anywhere we want:
|
1
2
3
4
5
6
7
8
9
|
.constant('PersonSchema', {
type: 'object',
properties: {
name: { type:
'string', title: 'Name' },
company: { type:
'string', title: 'Company' },
phone: { type:
'string', title: 'Phone' },
'address.city': {
type: 'string', title:
'City' }
}
})
|
Notice the type: 'object' and properties that we use to set up the root
of our schema. Don’t forget this or your form will not work with no errors and
you’ll be scratching your head like I did.
All our elements are pretty straight-forward. The only exception is the city, which is a slightly more complex binding. Angular Schema Form uses objectpath library to determine bindings so there’s some options if you have nested properties you want to access.
Form Setup
Remember those sf- attributes on our form in the modal template? Well the first one,
sf-schema, gets bound to the schema we just created. sf-model is bound to the
object we want to edit, in this case our row, but if we bind directly to the row we will be updating it
live, which can be nice sometimes but it would be good to have a “cancel” feature.
Let’s do that.
|
1
2
3
4
5
6
7
8
9
10
11
12
13
14
15
16
17
18
19
20
21
22
|
function RowEditCtrl($modalInstance, PersonSchema, grid, row)
{
var vm
= this;
vm.schema
= PersonSchema;
vm.entity
= angular.copy(row.entity);
vm.form
= [
'name',
'company',
'phone',
'address.city'
];
vm.grid
= grid;
vm.row
= row;
vm.save
= save;
function save()
{
// Copy row values
over
row.entity
= angular.extend(row.entity,
vm.entity);
$modalInstance.close(row.entity);
}
}
|
Alright, our modal controller is going to get $modalInstance, which the
$modal service injects for us. We can use that to interact with the modal (closing it and
so on). We’ll provide the PersonSchema, copy our row entity so we’re
not directly editing the row, and then the next property is form. What’s that?
We’ve given our form a schema, which tells it what properties to expect, but how about what order
they come in, or which ones we want to edit in this form? If we didn’t really care we could do
vm.form = ['*'], and then in our <form> do
sf-form="vm.form". The ['*'] tells Angular Schema Form to just use all the
properties from the schema, in whatever order the come out in. The problem with this is
our address.city property won’t show up correctly. We have to explicitly tell the
form what to expect, and since we have to tell it that we have to tell it all of them.
There’s lots of options for defining your form with Angular Schema Form: you can specify input types (text, radio, select, button groups), do hierarchical lists, tabs, conditional visibility, etc. There’s good examples on the project site.
The only thing left is the save function which copies over our updated row entity and
closes the modal. Tada! You are the proud owner of a modal editor for UI-Grid which you can update
whenever you want with only a couple lines. Almost painless, right?
Demo
Here’s a plunker showing it all working together.
Note: plnkr.co has been a little wonky about not loading fully sometimes; you may have to refresh it.
Et Fin
I hope you enjoyed this guide, and I’d like to help you out some more! Next time we’ll walk through creating a UI-Grid plugin that will let us reuse this modal row editor code and create them wherever we want in just seconds. We’ll talk about Angular development best practices and use a plugin skeleton for creating tests, automatically generating documentation, and all that fun stuff.